Hazard Marking, More About My Compressor, And CB250RS Cylinder And Seized Piston Removal

Happy New Year!

I took last week and yesterday off from posting due to Christmas and New Year, but I was able to get a few things done over the holiday period.

Firstly, I got sick of hitting my head on the shed doorway, so I decided it was time to remedy the situation.

First up, here’s the doorway in question from outside and inside the shed.

I measured the height from the highest part of the threshold and found it to be exactly 170 cm

As I’m 183 cm (about 6 foot) tall, this is low enough to be a real hazard for bumping my head on. Fortunately my local hardware store sells reflective hazard marking tape. Here’s the view of the same doorway from inside and outside the shed now.

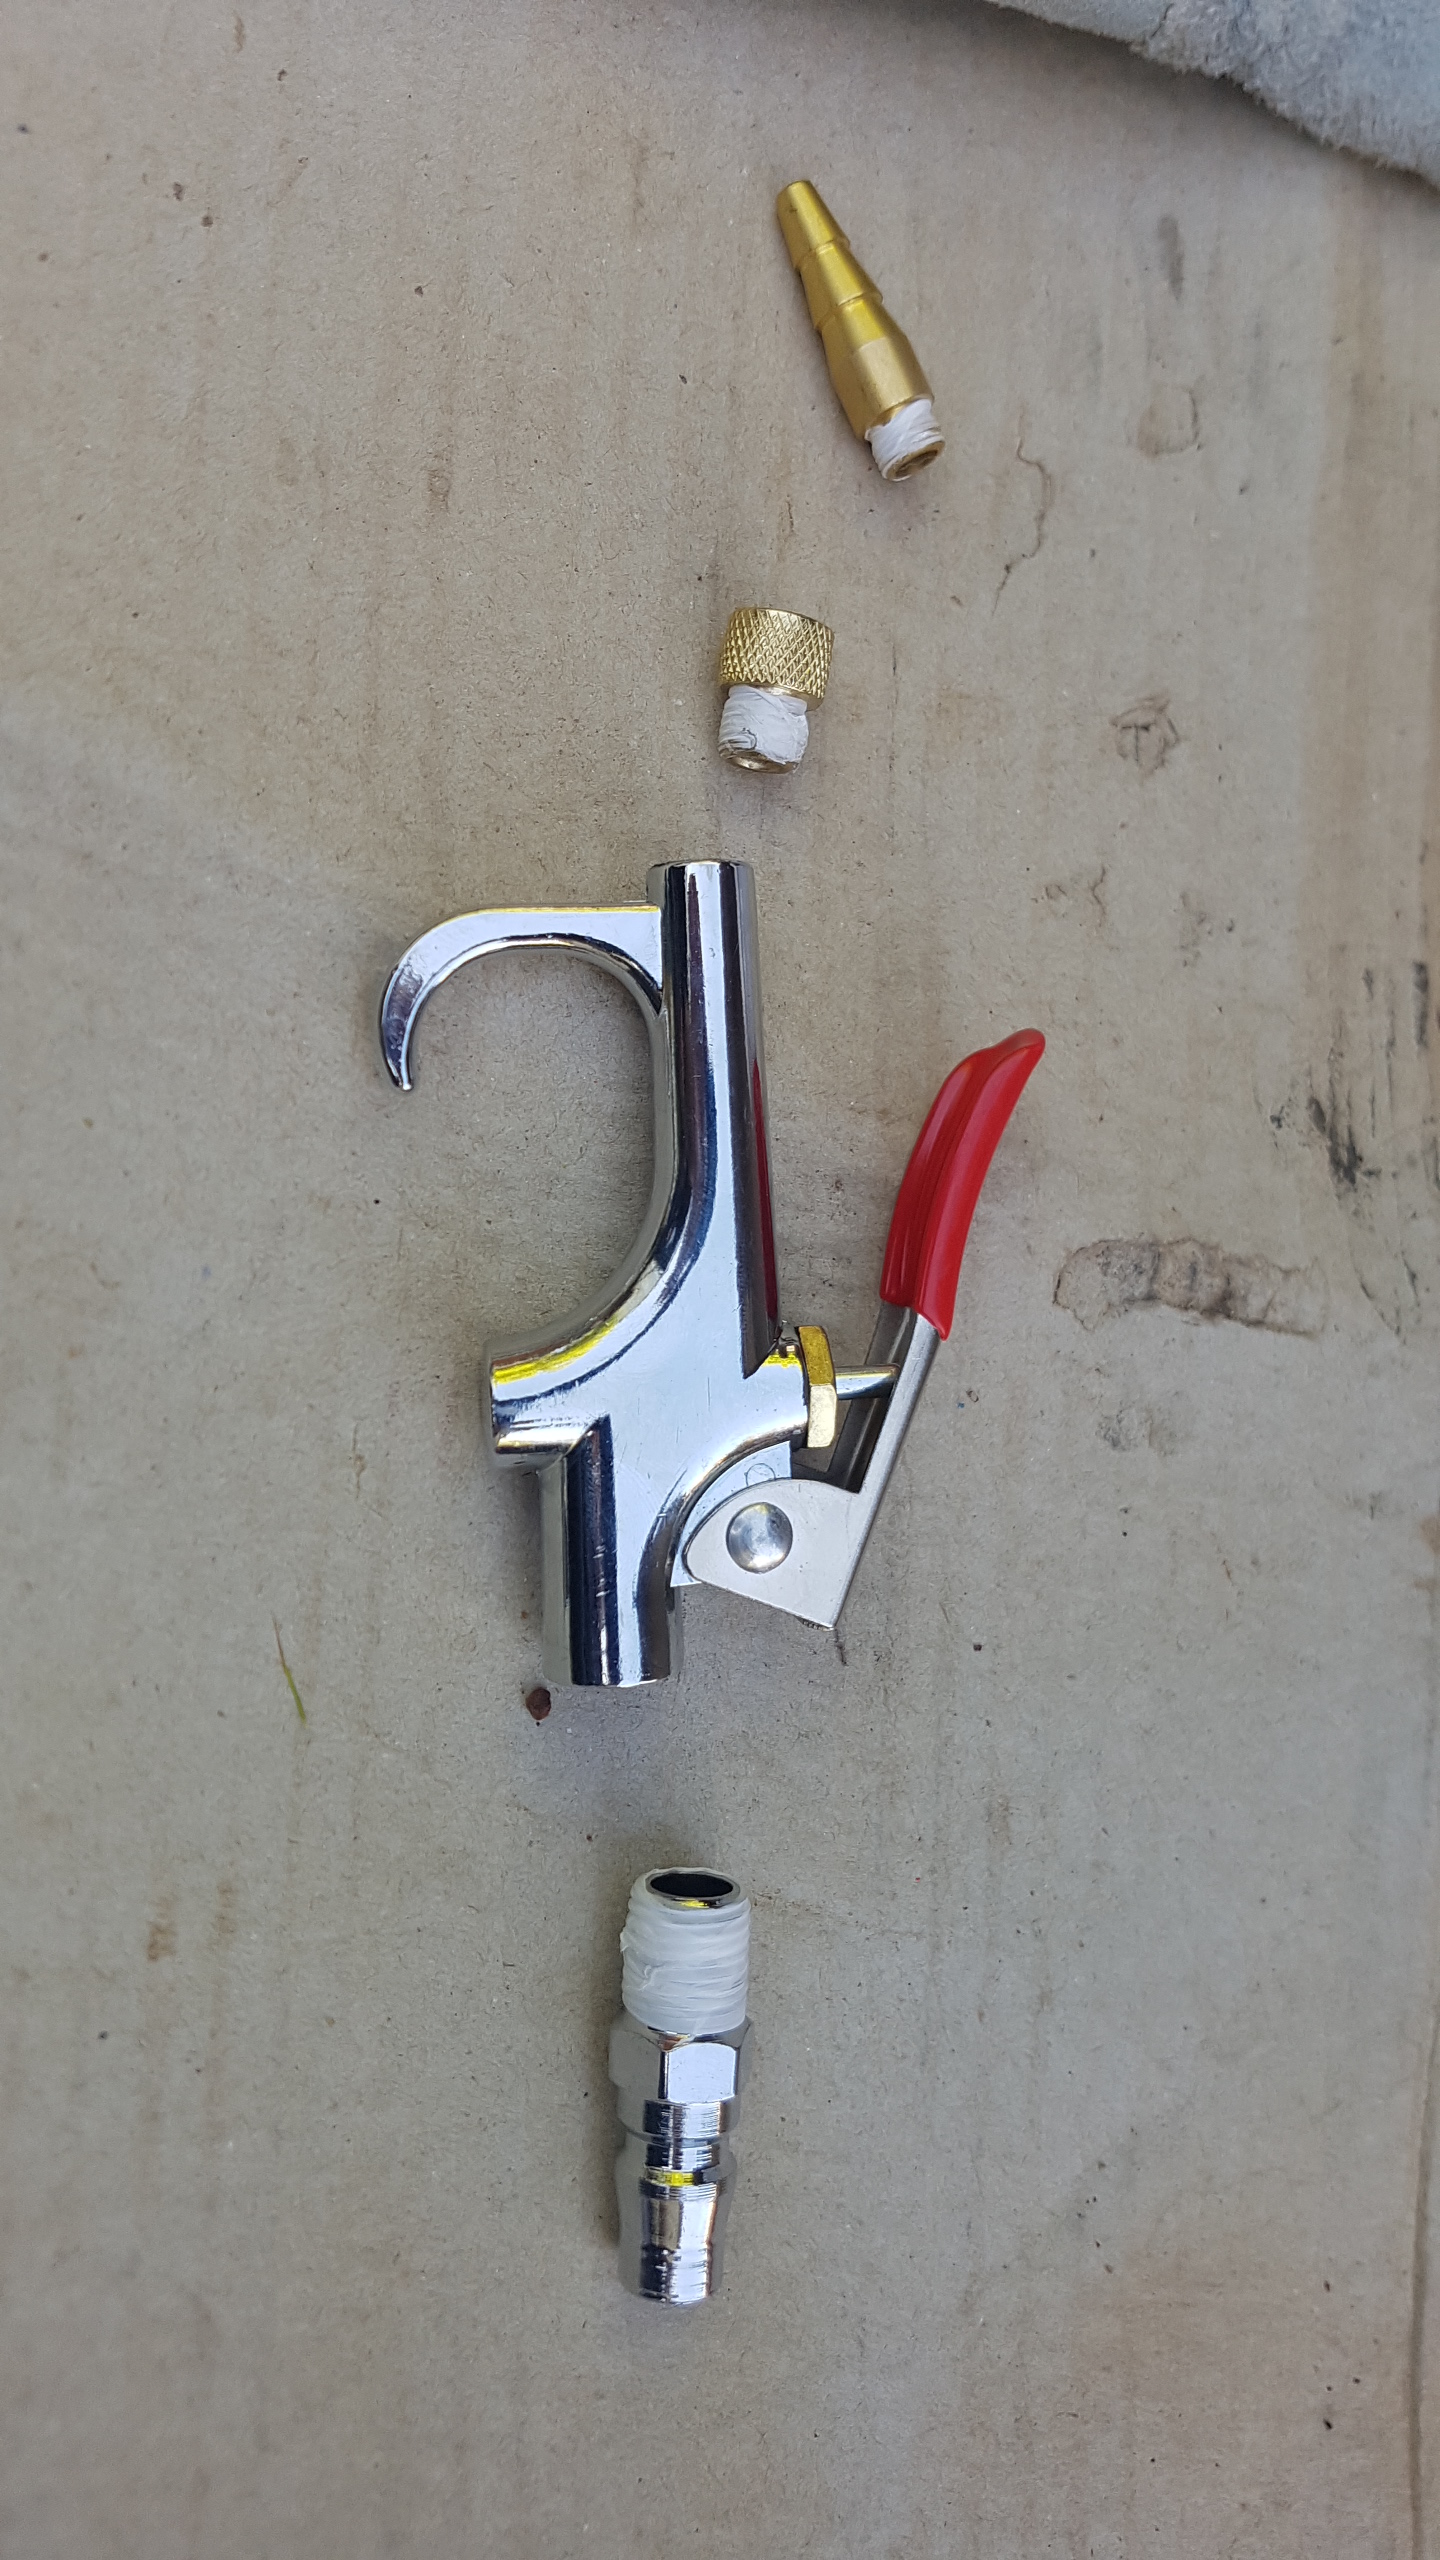
Next up, while I was using the air compressor to inflate the tyre on one of my wheelbarrows so I could do some work in the garden I decided to use the compressed air gun to clean some cobwebs out of the compressor itself. The brown acrylic paint started coming off some parts of the motor (mostly the plastic ones) but I noticed something new on the electric motor – a brand name!

A quick Google search told me that CMG is an Australian company that still makes electric motors. I haven’t had any luck identifying the motor model yet though.

Finally, I decided I was sick of working on Scarlet’s carburetor, so I decided to move onto the seized engine.

The two remaining mounting bolts for the cylinder were easy to remove.

The cylinder itself came off very easily too.

Inspecting the barrel didn’t reveal much at first glance.

Looking at the piston told another story, however!

It turned out the piston was seized to the dowel mounting it to the conrod.

As it wasn’t moving back and forth freely, there was some severe scoring on the outer side of the piston, most likely caused when the motor was turned over after it had seized.

With the piston free, I was finally able to maneuver the cam chain out.

I had another look at the inside of the cylinder and sure enough there was some nasty scoring on the outer side too, while the rear was relatively unharmed.

I removed the piston rings as best I could and cleaned the piston a little to look at the damage again

After only getting one circlip out and finding the mounting dowel to be completely immobile, I decided to use a hacksaw to crack the top of the piston open. After that, I was able to wedge a screwdriver in and split the piston completely.

I noticed some numbering “471” and “1” on the side opposite the “HON” and “DA” – this might indicate the original size or part number.

The conrod and mounting dowel seem to have seized together too. If this motor is going to run again, it’ll need a re-bore, oversized piston and most likely a new conrod as well, as I was a little overzealous with the hacksaw and left a few lines in the top of the conrod!

That’s all for now, regularly scheduled updates will return next week. The next update will most likely be an update on how Sylvie has handled not being ridden for nearly a month. I’m expecting a flat battery at the very least!

I Helped A Stuck Rider (And Had Another Shed Cleanup).

This evening I had to make a stop for fuel right after work, as I’d hit the reserve level on the way to work.

After getting most of the way home, I saw a rider stopped on the side of the road. I pulled over and asked if he was ok. He thanked me for stopping, and let me know he’d run out of fuel and his reserve wasn’t working for some reason.

He lived not far from my home and asked if I could give him a lift near his house so he could organise to come back for his bike. I agreed, and was just reorganising my luggage to make room  for a pillion passenger when he let me know his reserve was working again and he’d got the bike started.

He asked if I’d mind riding behind him to the nearest petrol station to make sure he got there without further issues. I agreed, of course!

He waved me on just before the last set of lights before the petrol station and yelled out one more “Thank you!” as I passed and turned off towards my suburb.

No photo or video unfortunately, as I stopped using the GoPro on my daily commutes a couple of months ago!

Earlier this week, I’d realised the shed was getting cluttered again, so it was time for a cleanup!

I started with the stray spanners, hex keys and and gloves on Erica’s seat.

The stray cardboard was next.

The spanners should have been here.

I put Erica’s battery on to charge, so I can start her again later and have another look at the electrical system. I needed somewhere to put the air tools and old brake lever, too.

The remnants of flat-pack shelves were getting in the way too.

I left a fair bit of clutter behind after soda-blasting and even had trimmer line I’d left on the floor.

All a bit of a shambles, really…

Not to mention the random cardboard with recently-replaced parts somewhere under it!

There was a bit of a gap on the shelf that needed filling, so the cowl I’d used as test piece for blasting went back there.

The new air hose and tyre gauge fit nicely over the pole on these shelves.

A few spanners went back in the right places on the peg board.

A layer of soda dust was wiped off Erica’s seat.

Sylvie’s old headlight was rescued from the cardboard.

The CBF250 headlight was boxed and the air tools were stacked under the blackboard. The spare dented CB50RS tank will be sand or soda blasted another day, so I decided to get it off the floor while I was at it.

Tucked away neatly on the shelf again.


The older ones were cleared from under the trickle charger and Scarlet’s seat cleared of soda dust.

Sylvie’s old side panels and bar ends were retrieved from under the cardboard.

I bagged and tagged the bar ends.

The side panels and bar ends found a home under the workbench, near boxes containing similar parts.

The old brake lever went in the box with the headlight under the chalkboard.

The air tools were stacked more neatly and the warped veneer panels that once were the back of a shelf were put under the boxes to flatten them again.

Stray cardboard was removed and the floor was finally visible again!

The sand blaster spec sheet and troubleshooting guide were put somewhere they’ll be found again.

Almost lost under here was the mounting pin that broke off one of Sylvie’s side panels.

I made room for the blasting gun on the peg board.

The mounting pin was left near the side panels so as not to go astray again.

The tub of blasting sand found a home on a shelf.

And some random parts were left on the clipboard for visibility. THe top one is either a fairing mount left behind from Nix or a random mounting washer from one a CB250RS headlight bracket or instrument cluster.

The tags from the replacement side panels went on top of the old ones to remind me to re-tag them.

All in all, the she is slightly more organised than it was when I started!

Bonus Post – Learning More About My Air Compressor

This week, I did some more research on the compressor after noticing the folllowing specifications on the end of the pressure vessel.

In case you can’t read it properly, it reads as follows:

M.A.N.
Werk München
Jahr/No 71 13086
Betr./Prüf.Dr 10/16 atü
Baumust.-KZ ZU 49
Inhalt-ca. 25 l

This is of course not in English! Roughly translated from German, with some research and guesswork on the abbreviations, it appears to read:

M.A.N. (truck and bus company)
(Manufacturing) Plant in Munich
Year/No 71 13086
Operating/Test Pressure 10/16 atmospheres over-pressure
Construction type  (model) ZU 49
Contents approx. 25 l

So the pressure vessel has 25 litres capacity and looks to have been made in Munich, Germany in 1971 for the air brake system of a truck or bus and later reused as part of a custom-made air compressor.

Armed with this information, I did some research into testing the actual flow rate of an air compressor and found the following formulae:

The formula for calculating the flow rate of a compressor at http://www.hosereels.biz/blog/post/3469129 is:

TANK GALLONS x 0.538 x PSIG  divided by SECONDS = flow rate in CFM (or cu ft/min)

Google tells me 1 L = 0.264172 US liquid gallons

1 CFM  = 28.32 L/min flow rate

The German-language pressure units converter found at https://www.einheiten-umrechnen.de/einheiten-rechner.php?typ=druck told me that the operating pressure of 10 atü is approx 156.4568 PSI and the test pressure is 16 atü or 241.7968 PSI.

So, 25 litres is 6.6043 gallons. From initial testing, it took approx 2:20 (140 seconds) to fill the tank from empty to a PSIG (gauge pressure) of approximately 95 psi when the cut-out switch kicked in, so the flow rate is about 2.4110 CFM or  68.2807 L/min.

This will help a lot with choosing air tools to use with the compressor, as most of them specify required flow rates at a specific pressure.

Further research told me that air compressors need their pressure vessels drained regularly, so I had a look for the drain valve. Unfortunately, I removed the whole valve assembly instead of just opening it, and got this oily,watery mess all over the pavers underneath the compressor as I quickly moved it to a more suitable work location.

The drain valve assembly had a lot of the acrylic paint used to paint the compressor on it, as well as some oily gunk coming out. I put it on a large rag to clean it up.

I went through my large spanners until I found the right size to unscrew the parts of the valve from each other. These turned out to be 19 and 27 mm.

Once freed from each other, I could see just how dirty the parts were.

I set about cleaning them up with some brushes and WD40.

It didn’t take long to clear the gunk out, so I kept cleaning.

Once most of the acrylic paint had come off, the brass seemed to be in pretty good condition!

I cleaned off the last of the old teflon sealing tape and applied a fresh layer.

The inside of the thread on the pressure vessel seemed to have a lot of gunk too, so I cleaned it off as well as I could.

With the mounting thread as clean as I could get it, I replaced the outer section of the drain assembly.

I put the drain plug back in and returned the compressor to its normal position before tightening the plug again.

I also noted the pressure cutoff switch had this assembly on the bottom.

There were quite a few cobwebs on the bottom!

I cleaned up the brass pieces as well as I could.

THen replaced them where I found them, only a little more tightly.

This looks to be an adjustment screww that has been painted over, so I’ll clean that up next time I work on the compressor.

Much better – no more cobwebs!

I haven’t properly tested the compressor again since draining it and cleaning these parts – I’ll see if there is any difference once I’ve cleaned the other adjustment screw.

I took several photos of the relief valve from different angles after noticing some writing engraved on it.

Using a combination of Google searching the partial wording I could make out, I was able to decipher that the following information is engraved on it:

SIZE 1/4 IN. FIG NO. 48.A
SIZE 3/8 SEAT
SET AT 50
KUNKLE VALVE CO
FT. WAYNE IND. US

If the release pressure of 50 PSI is correct, it seems I have either have a faulty pressure release valve or a faulty pressure gauge, as the release valve only starts releasing air at around 90-95 PSI on the gauge.

The next steps for the compressor will be checking and topping up the oil for the compressor motor, then replacing the pressure gauge and release valve

Experiments With An Air Compressor After An Unplanned Break

Regular readers may have noticed there was no post last week. With a small child, life sometimes gets in the way and I simply ran out of steam! Thankfully, I’ve recuperated and recharged so will be back to regular weekly updates whenever possible.

This week, I bought a second-hand air compressor with the intent of getting started on prepping Erica’s fairings.

The seller mentioned that he didn’t know the brand, thought it might have been home-made, and didn’t know any of its specifications.As it was only $50, I decided to take a chance on it anyway.

It came with an accessory kit the previous owner had bought.

I stopped by my local Bunnings hardware store on the way home to get a couple more tools and a cleaning kit to go with it. I also had the customary sausage on bread with onions on my way in.

Closer inspection once I got it home revealed that at the very least, the pump used was a Clisby brand one made in South Australia, with a delivery rate of 3 cu ft/min (around 85 L/min in modern SI measurements).

CIisby Engineering are still going strong but I couldn’t find any info about my compressor on their website.I tested it by pumping up some car tyres and discovered a leak at the bottom where the recoil hose was attached under the pressure gauge.

I found an online “click and collect” deal at Supercheap Auto that offered a sandblasting gun and 10 kg of garnet sand blasting media for less than the normal price of the sandblasting gun alone, so of course I took the deal!

Rather than trying to troubleshoot the leak, I opted to replace the hose entirely, so it was off to the hardware store again! I decided to get a connector and accessory pack that included a hose, and picked up some safety goggles and dust masks while I was at it.

To sort the leak out, I started by removing  the old recoil hose and adaptors from the compressor.

The new hose had male connectors on both ends while the old one had a female connector on one end, so  I was glad to have the extra connectors!


I decided to put a quick connect plug on the tank in case the recoil hose ever needs replacing again.

I opted for quick connect sockets on both ends of the recoil hose.

I fitted a quick connect plug to the tyre inflator.

I had a few options when assembling the air gun. As I already had a tyre inflator with a built-in pressure gauge, I opted for a classic configuration.

While I knew the compressor was probably a little underpowered for the garnet sand in the sandblaster gun, I decided to test it out anyway. As it didn’t come with a quick connect plug, I fitted one to it too.

Before the assembly, I set up a small work area with some cardboard and scrap pieces of an old flat-pack shelf.

I decided to test on and old spare rear seat cowl originally from Scarlet. One side was taped to mask it before blasting.


The garnet sand medium was quite coarse, so the results were rather unimpressive.
I had expected as much, as the operating pressure for the sandblaster gun with its normal sand medium is 90 PSI. I discovered while using it that the safety cut-out switch on the compressor kicks in at about 95-100 PSI, so it was hard to build up enough pressure for effective sandblasting. I had to release the tank pressure a few times in order to reset the safety switch, so it was very slow going.

Done for the day, I packed away the remaining spare parts in a drawer of my “fiddly bits” storage box and gathered the leftover used garnet sand together for quick clean-up the next day.

The next day I decided to test further with bicarb soda, as the lighter medium wouldn’t need as much pressure. I masked the opposite side of the panel for the test run.

It just so happened that Aldi had 1 kg boxes of cleaning bicarb this week, so I bought a couple.

After filling the sandblaster with soda, I gave it a test run. Due to the sandblaster being gravity-fed, I had to stop and refill the sandblaster at least twice and ended up going through the whole box of soda, but didn’t trip the safety cut-out at all. I even folded up the cardboard floor and re-used the bicarb for another round. Although it was less effective at removing the decals, the result on the paint was noticeably better for less effort.

The left side was sand blasted, and the right was soda blasted.

I put the leftover bicarb back in the box and wrote USED on it in big letters

I have some side panels on order for Sylvie, so next week’s update will probably be short and sweet.